Questions can be sent to: [email protected]

Overview

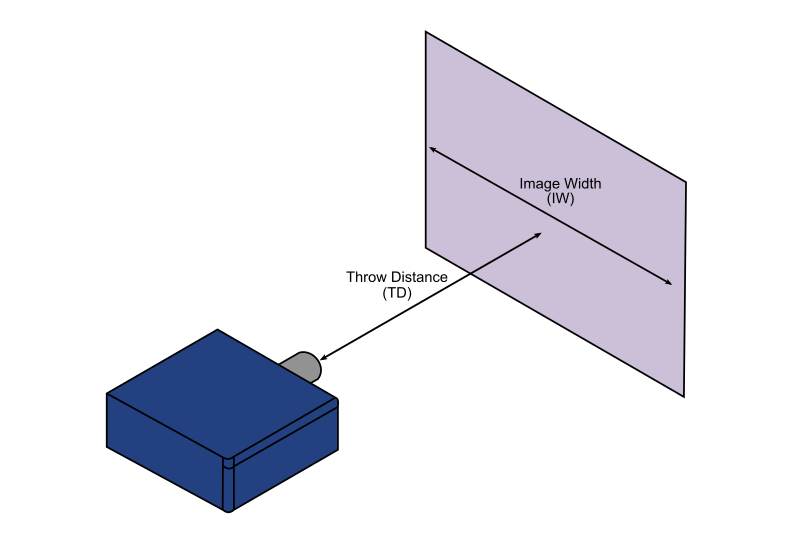
The PROPixx projector is our most versatile visual stimulation system. In this guide, we introduce several critical notions that influence the design of your research space and the validation of your desired projection geometry. This guide presents the principles which orient the configuration of a complete solution and includes a discussion of image dimensions, lens choice and screen placement. 

This guide introduces a subset of critical notions that guide the choice of PROPixx accessories. We encourage you to validate your calculations with a staff scientist ([email protected]) before finalizing a purchase.  

Image Dimensions

Aspect ratio

The first step is to identify the dimensions of the image that you wish to project. The native aspect ratio of the PROPixx projector is 16:9, which means that the PROPixx projects an image whose proportions are 16 units wide by 9 units tall. In other words, it produces an image that is 1.78x wider than it is tall.
The PROPixx can also produce 4:3 and 5:4 aspect ratios, by projecting images on a central subset of the total available pixels. We chose this approach because one pixel of the video input drives one pixel in the projected image, bypassing the pixel artifacts resulting from image scaling and processing. The PROPixx displays unused pixels in black.

While set to its native video mode, the PROPixx projector displays a 16:9 image. It is possible to change the aspect ratio of the image by modifying the display properties in your operating system. For example, presenting the image with a 4:3 aspect ratio will result in a smaller image (grey shading). The unused portions of the original 16:9 screen will display black pixels (coloured outer shading).

In this calculator, you can input your desired image width (in arbitrary units) below to automatically generate the height and diagonal dimensions of the image that is generated by a PROPixx operating in its native 16:9 video mode and aspect ratio.

The corresponding image dimensions of a PROPixx set in 5:4 or 4:3 aspect ratio are also automatically generated.

Lens Choice

In contrast to LCD screens or other types of visual displays whose physical dimensions are physically constrained by the imaging mechanism, we can outfit the PROPixx with one of many lenses that can produce a large variety of image sizes. 

Two parameters describe if a lens will be compatible with the image dimensions you want to achieve: the focus range and the throw ratio. The focus range refers to the minimal and maximal distances past the PROPixx, where the lens can produce an image that is clear and in focus. A projection screen can be placed anywhere within the focus range. The distance between the screen and the projector is known as the throw distance (TD).

The throw ratio (TR) characterizes the correct lens for your application according to the following equation: TR = TD/IW, where IW is the width of the 16:9 image generated by the PROPixx.

The PROPixx is fitted with a lens chosen to produce the desired image width (IW) at the desired throw distance (TD). TD is the distance measured from the front of the projector to the screen. The throw ratio (TR) characterizes the correct lens for your application where TR = TD/IW.

Example #1

A typical scenario is that a researcher wants to use a specific video feature of the PROPixx, but wants to match the dimensions of a visual display used in other research. For example, they might want to match the VIEWPixx/3D screen dimensions, a 16:9 CRT-replacement screen with a fixed 24-inch diagonal. We might want to make the most of a small testing room and place the projection screen as close as possible to the PROPixx, as afforded by the lens’s focus range.

Let’s assume that our throw distance will be TD = 1.22 m. The image width corresponding to a 16:9 VIEWPixx/3D screen is IW = 0.53 m. The corresponding throw ratio is TR = 1.22 m / 0.53 m = 2.29.

If you look at the list of available lenses on the PROPixx’s ordering information page, we find that the VPX-ACC-6503 has a focus range of 1.2 m – 9.75 m (4.0 -32 feet) and a throw ratio range of 1.85-2.4. This lens fits both of our requirements.

Several lens options are available to allow you to achieve a large range of image dimensions. This example illustrates a VPX-ACC-6503 set at TR = 2.29, projecting a 0.53 m wide image, 1.22 m away from the PROPixx projector.

Example #2

In other situations, the researcher wants to replicate an older system’s dimensions, which employs another aspect ratio, such as a 1024 x 768 4:3 CRT monitor. These displays often measured 0.32 m x 0.24 m, with a 0.4 m (i.e., 15.8 inch) diagonal. However, the image width we will use in our throw ratio calculation will not be 0.32 m. Instead, the correct dimension is the width of the native 16:9 image that the PROPixx generates (see section Aspect Ratio). The width of the native image that produces the desired 4:3 projection is IW = 0.60 m.  

The resulting throw ratio is TR = TD/IW = 1.22 m/0.60 m = 2.02. 

Therefore, the VPX-ACC-6503 lens is also the correct choice for this example. 

Rear and Front Projection Screens

So far, we have ignored practical constraints surrounding the placement of the PROPixx and the observer. We have not considered whether obstacles would prevent us from presenting an image in a direct line from the projector’s lens.

In practice, using a rear projection screen is often the simplest projection solution. In this setup, the participant’s eyes are typically directly in line with the mid-point of a projection screen (in both height and width). The projector is installed behind the screen, also projecting directly in line with the middle of the screen. We could choose a self-standing screen, or use a model that we can place directly on a desk. We could install the projector on a shelf at the same height (left-hand figure).

However, a drawback of rear projection installations is that the total space required is rather large. We often need more space when producing large images, which might become impractical in small rooms.  In this case, you may want to consider a front projection screen. Here, we place the projector and the observer on the same side of the screen (right-hand figure). 

In a rear projection installation (Figure A), the screen is placed between the projector and the observer. In a front projection installation (Figure B), the projector and the observer are located on the same side of the screen.

In many experimental designs, observers view a visual display from 50 cm to 70 cm away, just as they would typically be seated in front of a computer monitor. However, in front projection, it is essential to carefully consider where you will be placing the projector. It is easy to overlook that the head of the observer, or even head-mounted recording apparatus, is likely to obstruct the projection path, thus casting disrupting shadows onto the screen. One standard solution is to set the projector on a shelf and lower the position of the image as low as the system affords it. This solution works well for seated participants. However, if the research design requires mounting hardware to the head of the participant, such as a neurophysiology rig on NHPs, then additional clearance must be considered. Depending on the constraints of the projection geometry, it is possible that the center of the image cannot be aligned with the observer’s line of sight. This figure illustrates a successful wide-screen front-projection installation with a seated human subject, where eye-to-screen alignment was not critical and a large viewing distance was required as part of the research design.

When using the PROPixx with a front-projection screen, you should verify that the image projection path will remain clear of obstructions.

The choice of rear vs front projection, as well as the specific screen material, significantly impact the characteristics of the projected image. To learn more about screen material, Stewart Filmscreen offers a great introduction to the topic.

Lens Shift

In this configuration, you must use the optical lens shift of the PROPixx to lower the central point of the projection. Changing the location of the projected image will prevent the observer from casting a shadow onto the front projection screen. Most of our PROPixx-compatible lenses include a lens-shift feature that will allow you to introduce a 120 % vertical and 30 % horizontal lens shift. This optical lens shift ensures that changes in the location of the projected image will not significantly deform the size of the pixels. It also prevents processing delays and keystoning artifacts that software corrections might otherwise introduce. 

Most of our PROPixx-compatible lenses are not fixed in place but instead feature an optical lens shift. With this lens shift, you can manually adjust the projected location of the image of the projected image by mechanically adjusting the position of the lens in relation to the imaging chip of the projector.

Cite this guide

Kenny, S. (2020, July 17). PROPixx Projection Geometry and System Configuration. Retrieved [Month, Day, Year], from https://vpixx.com/learn/propixx_geometry_configuration