Skip to content
Logo Vpixx
  • Hardware
    • CRT Replacement
    • Projector
    • Video I/O Hub
    • Eye Tracker
    • Accessories
  • Software
    • LabMaestro Simulator
    • LabMaestro Pack&Go
  • About Us
    • Who We Are
    • What We Believe
    • Customer Relationship
    • Distributors
    • Partners
  • Support
  • Contact
  • Learn with VOCAL
  • LOGIN
Menu Close
  • Hardware
    • CRT Replacement
    • Projector
    • Video I/O Hub
    • Eye Tracker
    • Accessories
  • Software
    • LabMaestro Simulator
    • LabMaestro Pack&Go
  • About Us
    • Who We Are
    • What We Believe
    • Customer Relationship
    • Distributors
    • Partners
  • Support
  • Contact
  • Learn with VOCAL
  • LOGIN

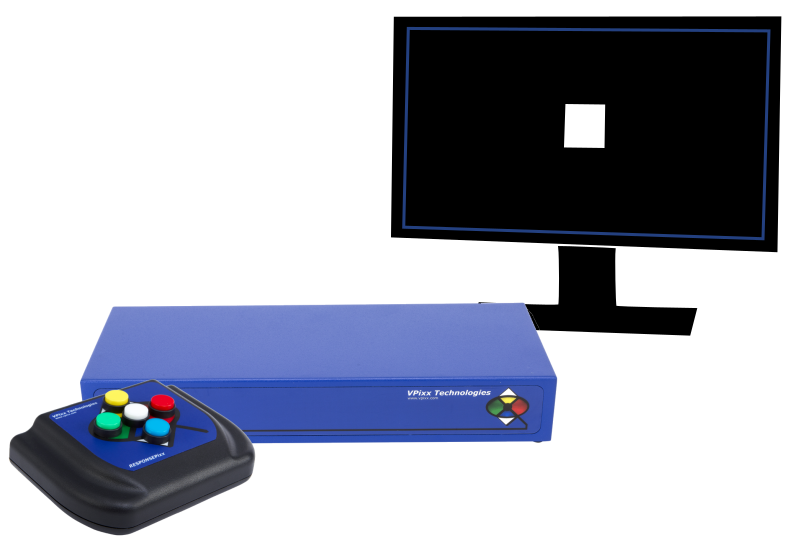
Record Response Times With a RESPONSEPixx Button Box

Calculate response times with respect to the video refresh of a visual stimulus using the RESPONSEPixx and MATLAB/Psychtoolbox.
  • Digital I/OMATLABProjectPsychtoolboxRESPONSEPixxsynchronization

Contributed by: Dr. Sophie Kenny, VPixx Technologies

Date published: May 21, 2020

  • Overview
  • Construction and functionality of the RESPONSEPixx
  • Perform basic interactions with your data acquisition device
  • Record and use a digital input log​
  • Restrict recording to specific button presses and cue participants to valid response choices​
Download

Questions can be sent to: [email protected]

Overview

This video guide is an introduction to the RESPONSEPixx  button box, using a data acquisition and synchronization system from VPixx Technologies and our MATLAB-compatible API. Use scripting to cue and record button presses, and to calculate response times relative to a key video event. 

Button presses recorded with a RESPONSEPixx button box and a data acquisition device from VPixx Technologies are synchronized with microsecond precision to video refresh.

The guide first includes a presentation of the construction and functionality of our electronic RESPONSEPixx button boxes and their connection with data acquisition devices, including the DATAPixx, PROPixx, VIEWPixx and VIEWPixx/3D.  MATLAB-compatible scripts are provided, and it is possible to follow along the video instruction.

After watching a presentation on the construction and functionality of the RESPONSEPixx, we will write a script in MATLAB that is able to record button presses during a reaction time experiment. We will write the script in three sections and learn key concepts along the way.

  1. Perform basic interactions with your data acquisition device.
  2. Record and use a digital input log.
  3. Restrict recording to specific button presses and cue participants to valid response choices.

Support material can be downloaded from the left sidebar.

Estimated completion time : 30 to 45 minutes.

Construction and functionality of the RESPONSEPixx


Instructions to download and install the Psychtoolbox and DATAPixx toolboxes are found here. 

Software tools for MATLAB and other programs can also be downloaded here.

Perform basic interactions with your data acquisition device

After installing Psychtoolbox and the DATAPixx toolbox, launch MATLAB. After a brief overview of important DATAPixx toolbox functions, you will be prompted to open a pre-existing MATLAB script containing a basic stimulus loop. 

This file is included in the downloaded materials from this session, and is called  IntroRPx_StimulusSetup.m.

If you run the script before completing the tutorial, you will only see a static grey image, visible for a short period of time.

When you execute IntroRPx_StimulusSetup.m before completing the tutorial, the white and black squares alternate too rapidly to be individually perceived. At this stage, you will only see a static grey image, visible for a short period of time.

For more information on registers and register commands, please see our Guide to Registers and Schedules.

Record and use a digital input log

When you are ready to view the next video, you can either continue from your current file or open IntroRPx_DinLog.m. This is an intermediary file that contains placeholder comments that identify where you will write the next few blocs of code. This file can allow you to follow along with the video more easily.

Once the script is modified and waits for a RESPONSEPixx button press, the white square will remain onscreen long enough to be perceived.


If you are unfamiliar with counting in binary or in hexadecimal, you can use online converters (e.g.,https://codebeautify.org/decimal-binary-converter) to convert between decimal and binary or hexadecimal. MATLAB uses
bin2dec()and dec2bin(), as well as hex2dec() and dec2bin() to do these conversions. 

Restrict recording to specific button presses and cue participants to valid response choices

If you wish, you can now load  IntroRPx_LEDsForcedChoice.m to continue the tutorial with all code written so far, with new placeholder comments. You can also find the completed MATLAB script in IntroRPx_Complete.m.  

Cite this guide

Kenny, S. (2020, May 21). Record response times with a RESPONSEPixx button box. Retrieved [Month, Day, Year], from https://vpixx.com/vocal/rt_responsepixx

Need help or more information?

Login to your account to access product documentation and more.

Go to MyVPixx

Talk to us

(514) 328-7499
1 (844) 488-7499 – Toll Free USA/Canada

VPixx Technologies Inc.
630 Clairevue West, suite 301
Saint-Bruno, QC Canada, J3V 6B4

Our products

CRT Replacement Projector Video I/O Hub Eye Tracker Accessories
Logo Vpixx

Menu

Hardware Software About Us Support Contact Terms & Privacy

Our newsletter

Stay informed about our New Products, Software Updates and much more! 

Subscribe to our newsletter
© 2022 VPixx Technologies Inc. – All rights reserved